The Seven Empires - Solution
Written by Nishant Pappireddi and Justin Yokota
Answer: GENEVA CONVENTIONS
The maps and tables depict positions and moves in games of Diplomacy. Diplomacy has 7 players, each playing a Great Power from just before WWI. The 7 countries are Austria-Hungary (red), England, France (blue), Germany (gray), Italy (green), Russia (white), and Turkey (yellow). The tables show the orders for all the countries except for England, and the maps show the starting positions of their Armies and Fleets.
The first step is to identify the images for each board. It turns out that each image clues a battle:
Each of these historical battles involves a Diplomacy country on each side, and each one corresponds to a battle on the board between those two countries. These battles on the board all involve the attacking country moving into a province and the defending country holding in that province. Both the attacker and the defender are potentially supported by other units. The attacker wins if they have a strictly greater number of units supporting them than the defender, while the defender wins if they have an equal or greater number of supports.
However, with just the given orders, the battles on the board don’t result in the historical victors winning. The only way to have the correct historical winners is to involve the missing English units, all of which are Fleets (since no Armies are missing). One English Fleet is involved in each battle, and the positions of all the English Fleets can be completely determined.
For each battle involving England, the English Fleet needs to be present to take part in the battle, either to hold against an unsupported attack (if England is supposed to win), or to be dislodged by a supported attack (if England is supposed to lose). In either case, the Fleet must be in the province being attacked by the opposing country.
For the battles involving two other countries, there are a number of different ways the English Fleet can affect the battle:
- By supporting the country that is supposed to win the battle. The Fleet can support the attack on the defender’s province, or it can support the defender holding in that province. For an English Fleet to be able to support in either case, it must be located in an adjacent province, and it must be able to itself move into the province where the battle is taking place. This means that each of the two provinces must be either a sea province or a coastal land province. Furthermore, if these are two adjacent coastal provinces, their border must be along the coast: for example, an English Fleet in Smyrna can’t move into or support into Ankara, since the border between these provinces is entirely inland.
- By cutting one of the supports on the side that is supposed to lose the battle. This simply involves the English fleet moving from its current province to the province of the unit giving support. The same restrictions on the two provinces as explained in the previous case still apply to the English Fleet.
- By convoying an attacking army to the province it’s attacking. This requires the English Fleet to be specifically in a sea province (not a coastal province). It could either convoy the army by itself, between two coastal provinces that both border the same sea zone, or it can be part of a connected chain of convoys that connect the army’s origin and destination provinces via multiple connecting sea provinces.
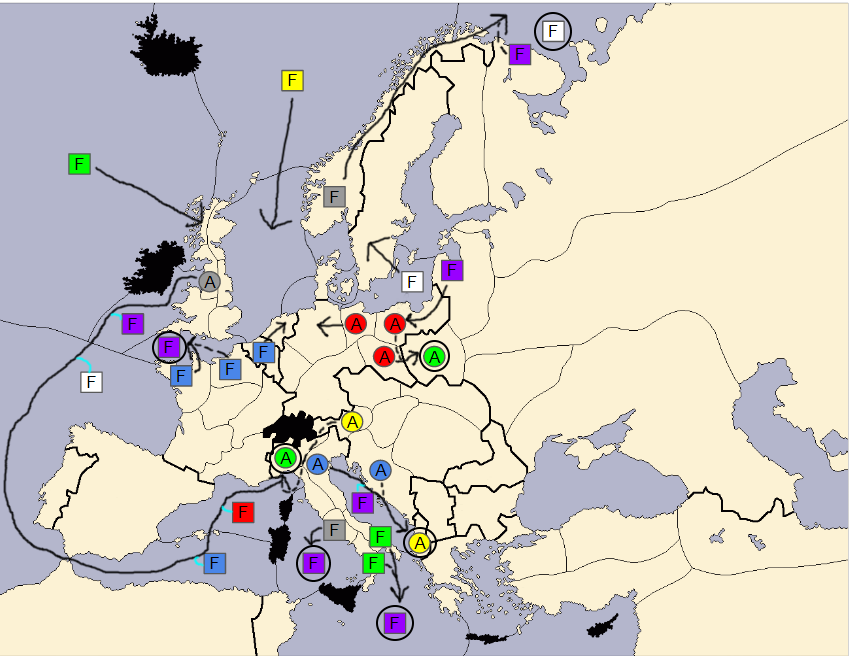
Here are the details of the battles, as well as maps showing all countries’ orders. A circle means a hold, solid arrows are moves, dotted arrows are supports, and light blue arrows are convoys. English fleets are purple.
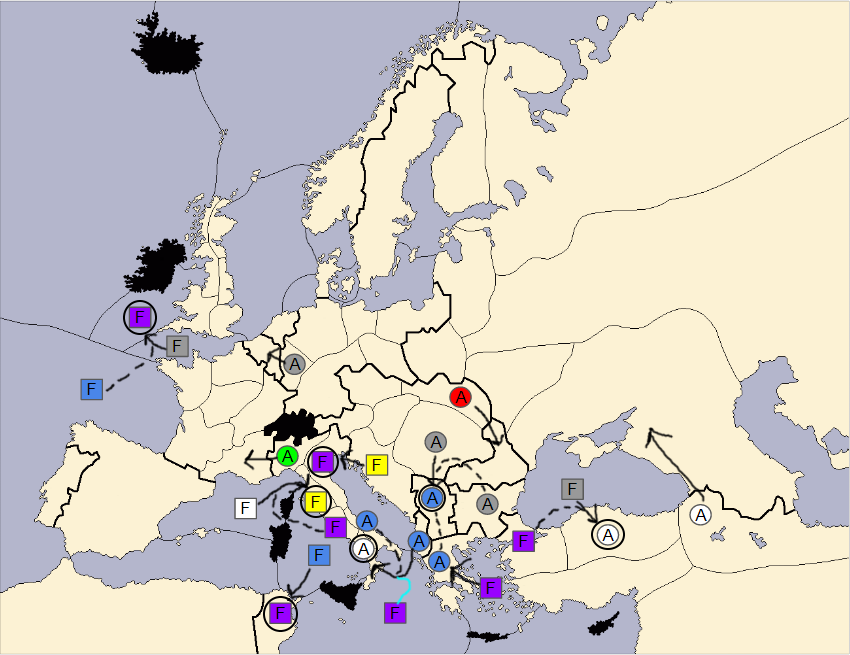 | |||||
| Board 1 Battle | Historical Winner/Loser | Battle Location on Board | English Fleet Location | English Fleet Order | Type of Action |
|---|---|---|---|---|---|
| Borodino | France/Russia | Naples | Ionian Sea | Fleet ION C Army ALB-NAP | Convoying the attacking army |
| Champagne (2nd) | Germany/France | Serbia | Aegean Sea | Fleet AEG-GRE | Cutting the defender’s support |
| Chesme | Russia/Turkey | Tuscany | Rome | Fleet ROM S Fleet GOL-TUS | Supporting the attacking unit |
| Jerusalem | England/Turkey | Venice | Venice | Fleet VEN H | Participating in the battle |
| Kilimanjaro | Germany/England | Irish Sea | Irish Sea | Fleet IRI H | Participating in the battle |
| Polar Star | Germany/Russia | Ankara | Constantinople | Fleet CON S Fleet BLA-ANK | Supporting the attacking unit |
| Thousand Islands | England/France | Tunis | Tunis | Fleet TUN H | Participating in the battle |
 | |||||
| Board 2 Battle | Historical Winner/Loser | Battle Location on Board | English Fleet Location | English Fleet Order | Type of Action |
| Bagration | Russia/Germany | London | Yorkshire | Fleet YOR S Army WAL-LON | Supporting the attacking unit |
| Compass | England/Italy | North Africa | North Africa | Fleet NAF H | Participating in the battle |
| Galicia | Russia/Austria | Portugal | Spain (either coast)* | Fleet SPA (sc/nc) S MAO-POR | Supporting the attacking unit |
| Isonzo (1st) | Italy/Austria | Belgium | North Sea | Fleet NTH S Army BEL H | Supporting the defending unit |
| Magenta | France/Austria | Syria | Eastern Mediterannean Sea | Fleet EAS S Army AMY-SYR | Supporting the attacking unit |
| Scimitar Hill | Turkey/England | Clyde | Clyde | Fleet CLY H | Participating in the battle |
| Trafalgar | England/France | Trieste | Trieste | Fleet TRI H | Participating in the battle |
 | |||||
| Board 3 Battle | Historical Winner/Loser | Battle Location on Board | English Fleet Location | English Fleet Order | Type of Action |
| Asiago | Italy/Austria | Warsaw | Livonia | Fleet LVN-PRU | Cutting the attacker’s support |
| Axis | Germany/Italy | Piedmont | Irish Sea | Fleet IRI C Army LVP-PIE | Convoying the attacking army |
| British Somaliland | Italy/England | Ionian Sea | Ionian Sea | Fleet ION H | Participating in the battle |
| North Cape | England/Germany | Tyrrhenian Sea | Tyrrhenian Sea | Fleet TYS H | Participating in the battle |
| The Pyramids | France/Turkey | Albania | Adriatic Sea | Fleet ADR C Army VEN-ALB | Convoying the attacking army |
| Reindeer | Germany/Russia | Barents Sea | St. Petersburg (north coast)* | Fleet STP (nc) S Fleet NWY-BAR | Supporting the attacking unit |
| Yorktown | France/England | English Channel | English Channel | Fleet ENG H | Participating in the battle |
*One minor note is that a few coastal provinces (Spain, St. Petersburg, and Bulgaria) have two separate coasts, which means that a fleet located in one of these provinces has a different set of adjacent provinces it can move into or support into, depending on which coast it’s located in. In the given battles, the English Fleet in St. Petersburg can only support an attack into the Barents Sea from its north coast, while an English Fleet in Spain can support an attack into Portugal from either coast.
The final step is to arrange all 21 historical battles into a single timeline, sorting by date:
| Battle | Starting Date | English Fleet Location |
|---|---|---|
| Thousand Islands | 16 August 1760 | Tunis |
| Chesme | 5 July 1770 | Rome |
| Yorktown | 28 September 1781 | English Channel |
| The Pyramids | 21 July 1798 | Adriatic Sea |
| Trafalgar | 21 October 1805 | Trieste |
| Borodino | 7 September 1812 | Ionian Sea |
| Magenta | 4 June 1859 | Eastern Med |
| Galicia | 23 August 1914 | Spain |
| Kilimanjaro | 3 November 1914 | Irish Sea |
| Isonzo (1st) | 23 June 1915 | North Sea |
| Scimitar Hill | 21 August 1915 | Clyde |
| Champagne (2nd) | 25 September 1915 | Aegean Sea |
| Asiago | 15 May 1916 | Livonia |
| Jerusalem | 17 November 1917 | Venice |
| British Somaliland | 3 August 1940 | Ionian Sea |
| Compass | 9 December 1940 | North Africa |
| Reindeer | 22 June 1941 | St. Petersburg |
| Polar Star | 10 February 1943 | Constantinople |
| Axis | 8 September 1943 | Irish Sea |
| North Cape | 26 December 1943 | Tyrrhenian Sea |
| Bagration | 22 June 1944 | Yorkshire |
The first letters of the English Fleet locations spell out the cluephrase TREATIES IN CALVIN'S CITY. John Calvin worked in Geneva as a theologian during the Protestant Reformation, creating the Protestant denomination later named Calvinism. The famous treaties signed in Geneva are the GENEVA CONVENTIONS.
Author's Notes
NP: I originally came up with an idea for a Diplomacy-based metapuzzle. It was originally a pure meta where the feeder answers would clue pairs of DIplomacy provinces, and the solution was to take the unique province between each pair and extract the first letters. We testsolved this and similar pure meta ideas, but we eventually concluded that a pure meta Diplomacy puzzle was too basic.
Justin then came up with the main idea that would eventually be used in this puzzle. He suggested playing out an actual turn of Diplomacy, with one country’s units missing, so the answer would be extracted from the locations of those missing units. These locations would be determined by cluing historical battles whose participants matched those in the game. The missing unit would then help the winner of the historical battle win the Diplomacy battle. We then had the feeder answers being the names of these historical battles. We decided to have England as the missing country, and I came up with the historically thematic idea of forcing them to have only fleets and no armies, in order to constrain the number of possible locations from which the English units could influence a battle.
Testsolvers liked this new version of the puzzle, but forcing the feeder answers to be names of battle was too constraining, especially when trying to disguise it by using battles/operations with common words as names, such as Asiago, Magenta, and Compass. We thus changed this into a regular puzzle, using images to clue the historical battles instead. This allowed us to use a few battles named for their locations, as well as to add a fun image identification step instead of just giving the battle names directly. In addition, using 3 boards instead of 1 allowed for a long cluephrase which clued a very thematic answer.
Overall, although I was originally disappointed at having this puzzle demoted from a metapuzzle to a regular puzzle, I’m very happy with how it finally turned out.